When living full-time in a RV, there are things that make life a little easier and more convenient. We have been living in a RV for several years now and have had to do our laundry at the local laundromats. Our trailer was purchased with the washer and dryer prep installed. Over the last couple of months, we had been talking about getting a washer and dryer for the trailer and finally made the choice to get a set. keep reading for advice and steps for the washer and dryer installation.
View the washer dryer set here. You can also find the washer and dryer on Amazon! Be sure to get the washer pan and dryer vent if needed!
Choosing the right washer and dryer
Once we decided that we were going to get a washer and dryer for the trailer, we needed to decide on what kind to get. There are several kinds of washers and dryers that we looked at including a combo washer and dryer, which means there is only one machine that washes and dries the clothes. The combo units have both vented and ventless options available.
there are also stackable units, there is the option for the dryer to be vented or ventless with these as well.
The ventless dryer works on the principle of condensation. This means you don’t have to drill a vent hole in the side of the camper. The con with this dryer is that the dry time is much longer than a typical vented dryer that pushes the warm air outside.
We chose to get the Splendide washer and dryer set. We also went with a vented dryer, so yes, we punched a 4″ hole in the side of the trailer.
Must have tools
This was an easy project that was completed within the day. The items that we used in this project were:
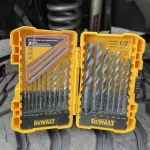
- Drill
- 4” hole saw bit
- Silicone caulk
- 5/64 drill bit
- 11 in 1 screw driver


Plan for a Project
We had a project to do since our trailer has the washer and dryer prep, but no hole in the wall for the vent. The washer and dryer prep for this trailer is in the closet in the front of the trailer. On the outside wall there was a sticker that said “place dryer on this wall according to manufactures recommendations” (there were no recommendations to be found anywhere).
The front nose cap that protects the trailer wraps around the side and we didn’t know how far back to measure so that when we drilled the vent hole it wouldn’t hit the cap or the seal around it. We were on our own to figure it out.
vent project
We had an idea on how we wanted to go about it so that we would not damage the trailer when drilling the hole.
Inside the vent kit, there were four pieces for the installation and screws. A hard plastic vent pipe with flap attached, an exterior cover to seal and protect the plastic vent pipe, an interior face plate, and 2’ of flexible ducting with clamps.
In addition to this, we purchased silicone caulk and roughly 4’ of flexible ducting. (2′ doesn’t get you anywhere close to where it needed to be)
Installation | the dryer vent
*our washer dryer hookups are on the passenger side of the trailer*
Step 1.
We emptied the closet to make sure that there was as much room as possible to work.
step 2.
We went to the outside of the camper to look at the cap and seal to find out how far it was wrapped around the side of the camper. (It wraps around the trailer more than we thought and we’d hate to drill through it)
step 3.
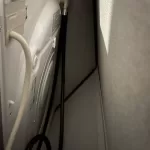
We measured the area where the dryer would be placed, so that we were able to reach the vent and install the flexible dryer tube to the vent after it had been installed. (Once the washer and dryer are installed there is very little room to reach your arms in there – inches at most) see how tight they fit here.
step 4.
We measured up the wall in the closet where we would be installing the vent so it would be easy to reach without pinching the flexible dryer tube. We found that it was about 22” from the ground. We made a mark on the wall at that height. Now that we found the height we wanted, we needed to find where left to right so that we didn’t drill into the nose cap or seal.
step 5.
To Find the left to right measurement, we took the interior faceplate of the dryer vent and taped it to the wall as close to the water hookups as we could without overcrowding them. This was as far right on the wall as we could go (furthest place from the front nose cap). The center of the faceplate, not top, should be close to the height marking you previously made.
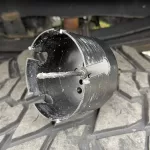
step 6.
This is the scary part, it’s time to drill a 4″ hole all the way through the trailer. (don’t worry, its not actually that big of deal)
From inside the trailer in the center of the interior face place, use a small drill bit and drill a hole all the way through the interior wall and the exterior siding.
step 7.
After drilling the small hole, verify outside that it is in a good location to the nose cap. Since it was in a good location for us, we proceeded to drill the 4” hole with a hole saw. We started drilling the bigger hole on the outside, so the fiberglass siding didn’t splinter or break. We placed the internal drill bit of the hole saw into the small hole made in the last step and started drilling.
Once the hole saw is through the exterior siding, we went inside and finished from the inside. Now there’s a 4″ hole all the way through the trailer and you’re done. (just joking)
step 8.
Next, install the hard plastic vent pipe into the 4″ hole. To do that, we dry fit everything together to make sure we knew it all went together before adding the silicone caulk and screwing it together.
step 9.
insert the hard plastic vent pipe half way into the hole before adding caulk to it, avoiding the mess on the inside portion of the pipe. We added caulk around the pipe and on the exterior face plate to seal up as much of the hole as possible. We made sure to check our level on the face plate and then screwed it in.
step 10.
After screwing the vent pipe to the trailer, we wiped the silicone around the edges of the face plate ensuring no gaps and that there was a smooth bead around the entire assembly preventing water from being able to get behind the vent pipe.
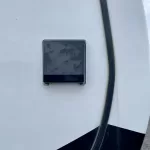
step 11.
When attaching the exterior vent cover, there is a lip on the top of the vent pipe that the cover catches to rest on along with two screws that secure the cover to the trailer. We added a bead of caulk to the surface that would be in contact with the trailer’s siding.
we set the cover so the top lip caught then we pressed the cover down to the trailer and screwed it into place. Again, wiping the caulk making sure that edges had a good seal so no water could get behind it.
step 12.
lastly, on the inside of the trailer we had to install the interior face plate. We added caulk to the inside of the hole around the vent pipe and to the back of the face plate. We put the face plate over the vent pipe and pressed it firmly to the wall, checked that it was level, and screwed it to the wall. wiped the silicone again and made sure everything was sealed properly.
washer and dryer installation
After we installed the dryer vent, it was an easy installation of the washer and dryer. The washer comes with a water catch pan in case of a water leak. We fit it together and placed it in the bottom left side of the closet furthest from the water hookups and the vent. then placed the washer into the closet inside the water pan.
The instructions tell you to run water through the lines before installing them onto the washer to prevent debris from going into the washer if the lines haven’t been used before. We used a five gallon bucket and ran both hot and cold water through the lines before installing them.
Next, We took the washer drain line and attached it to the drain pipe next to the water hookups. Before we installed the dryer, we turned the water and ran a quick cycle through the washer to check for leaks and ensuring everything was working properly before closing up the space with the dryer.
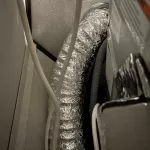
Installing the dryer was definitely a two person job. To get the dryer in, one person needed to lift the dryer into place while the other person held the flexible ducting up so it could be attached to the vent once in place (This is where making sure that the vent is high enough on the wall comes into play).
Once the dryer was in place, we had to crawl on top of the machines and install the dryer ducting to the new vent on the wall. it’s a very tight area to fit two hands and get it to all fit together nicely. Make sure when installing the ducting that there are no sharp bends.
Once the dryer was in place and all hooked up, we ran the dryer to make sure that the flap on the vent opened when it was suppose to and ensure everything with the dryer worked properly. (now you’re actually done)
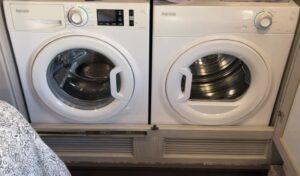
the Final product
Now that we have our washer and dryer, we are able to do laundry when we want without the hassle of having to pack up and take it to a laundromat. The Splendide washer has plenty of room to wash a full basket of clothes or most bedding in a single wash. (king size duvet cover, fitted sheet, and pillow cases)
The Splendide vented dryer does a great job of drying clothes and typically takes less than an hour. if the clothes are heavier such as a full load of work jeans and jackets, it takes about an hour.
What trailer did we install these in?